Each camera has input and output signals those can be used for synchronization.
Input signal can be used as a Trigger for the next image exposure.
Output signal can be used as an indication of Exposure Active or Frame Active for synchronization with external devices (e.g. flash light).
There are many different possible connections and triggering setups. We selected a few of them.
All software examples are implementations in xiAPI. For simplification - no image structures are allocated and errors are not handled.
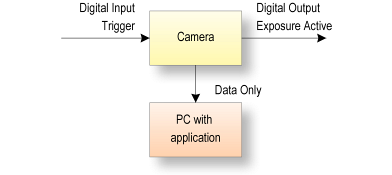
In this setup, each image is triggered by Digital Input Trigger. After the image is triggered, it can be read using xiGetImage.
This setup ensures low latency between the trigger signal and image Exposure start. This time should be less than 10us.
xiAPI Example:
HANDLE handle;
xiOpenDevice(0, &handle);
// select input input 1 as trigger
xiSetParamInt(handle, XI_PRM_GPI_SELECTOR, 1);
xiSetParamInt(handle, XI_PRM_GPI_MODE, XI_GPI_TRIGGER)
// select trigger source
xiSetParamInt(handle, XI_PRM_TRG_SOURCE, XI_TRG_EDGE_RISING);
// set digital output 1 mode
xiSetParamInt(handle, XI_PRM_GPO_SELECTOR, 1);
xiSetParamInt(handle, XI_PRM_GPO_MODE,  XI_GPO_EXPOSURE_ACTIVE);
xiStartAcquisition(handle);

// Trigger signal should start image exposure within timeout
#define TIMEOUT_IMAGE_WAITING_MS 10000
xiGetImage(handle, TIMEOUT_IMAGE_WAITING_MS, &image);
// process image here

xiCloseDevice(handle);
Timing diagram shows the Trigger event, Camera Status, Exposure Active Signal:

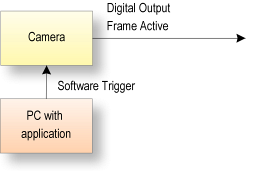
In this setup, each image is triggered by software. After the image is triggered, it can be read using xiGetImage.
xiAPI Example:
HANDLE handle;
xiOpenDevice(0, &handle);
// set trigger mode
xiSetParamInt(handle, XI_PRM_TRG_SOURCE, XI_TRG_SOFTWARE);
// set digital output 1 mode
xiSetParamInt(handle, XI_PRM_GPO_SELECTOR, 1);
xiSetParamInt(handle, XI_PRM_GPO_MODE,  XI_GPO_FRAME_ACTIVE);
xiStartAcquisition(handle);

Sleep(1234); // wait for right moment to trigger the exposure
xiSetParamInt(handle, XI_PRM_TRG_SOFTWARE, 1);
xiGetImage(handle, 100, &image);
// process image1 here
Sleep(10); // on most cameras the next trigger should be delayed
xiSetParamInt(handle, XI_PRM_TRG_SOFTWARE, 1);
xiGetImage(handle, 100, &image);
// process image2 here

xiCloseDevice(handle);
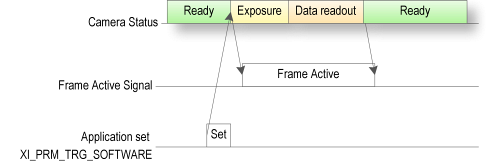
Timing diagram shows the Trigger event, Camera Status, Frame Active Signal:
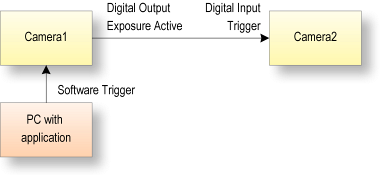
In this setup, each image is triggered by a software call. After the image is triggered, it can be read using xiGetImage.
This setup ensures low latency between the two cameras' exposures. interfaces.
xiAPI Example:
HANDLE handle1,handle2;
// open both cameras
xiOpenDevice(0, &handle1);
xiOpenDevice(1, &handle2);
// set trigger mode on camera1 - as master
xiSetParamInt(handle1, XI_PRM_TRG_SOURCE, XI_TRG_SOFTWARE);
xiSetParamInt(handle1, XI_PRM_GPO_SELECTOR, 1);
xiSetParamInt(handle1, XI_PRM_GPO_MODE,  XI_GPO_EXPOSURE_ACTIVE); // Note1
// set trigger mode on camera2 - as slave
xiSetParamInt(handle2, XI_PRM_GPI_SELECTOR, 1);
xiSetParamInt(handle2, XI_PRM_GPI_MODE,  XI_GPI_TRIGGER);
xiSetParamInt(handle2, XI_PRM_TRG_SOURCE, XI_TRG_EDGE_RISING);
// start
xiStartAcquisition(handle1);
xiStartAcquisition(handle2);
Sleep(1234); // wait for right moment to trigger the exposure
// trigger acquisition on Master camera
xiSetParamInt(handle1, XI_PRM_TRG_SOFTWARE, 1);
// get image from both cameras
xiGetImage(handle1, 100, &image1);
xiGetImage(handle2, 100, &image2);
// process images here
xiCloseDevice(handle1);
xiCloseDevice(handle2);
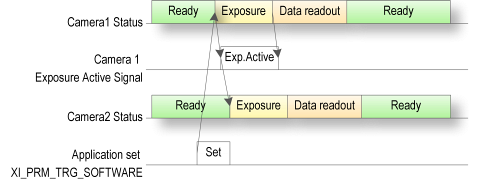
Timing diagram shows the Trigger event, Camera1 and Camera2 Status, Exposure Active Signal from Camera1:
To connect xiMU cameras this way - please read our Knowledge Base article about Connecting Two xiMU Cameras With Synchronized Acquisition
Each camera type has different signal levels defined.
Please check the manual before connecting any of the camera signals.
Examples: